How-To Guides
- Auto Upgrade Process
- Update Chrome Browser
- Factory Reset
- Set Clock
- Disable Onscreen Keyboard
- Check Ubermix Version
- Install/Update Ubermix
- Disable Secure Boot
- Reset BIOS Password
- Update BIOS
-
Auto Upgrade Process
All Ubermix systems are now running an automatic system updater which will take care of Ubermix upgrades from now on, however some devices running older versions of Ubermix will need to be manually reset and upgraded using a new Ubermix USB key. If you need new Ubermix USB keys, please contact your site technician.
Upgrade Process
When a system is turned on or restarted, within a minute a message will appear informing the user that an upgrade is available, and whether or not it needs to be reset manually first:
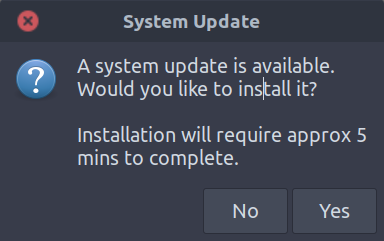
- Click “Yes” on the upgrade pop-up
- Wait for the computer to restart and perform the upgrade process
- This will take approximately 5-10 minutes
- The computer will automatically restart after the upgrade
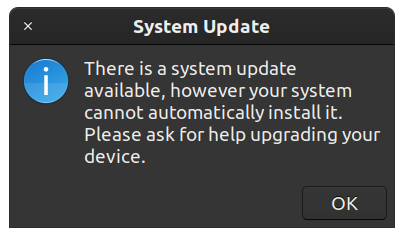
If you receive a message stating the system cannot automatically install the update, reinstall Ubermix using the USB install key.
-
Update Chrome Browser
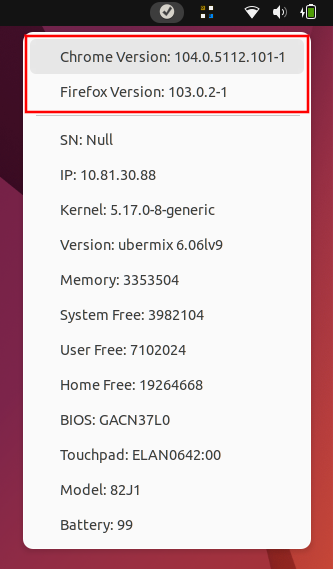
- Click on the status icon in the upper-right corner of the screen, near the system information panel
- Click on “Chrome Version: …”
- Wait a few minutes for updates to install
-
Factory Reset
- Completely power off the system
- Press the power button and wait for the ubermix countdown, then tap Esc to get into the system menu
- Use the arrow keys to select “Restore Factory Settings” and press Enter
- Press 1 then Enter to retain user files; OR
- Press 2 then Enter to completely erase the laptop
- Follow any additional instructions on screen
-
Set Clock
- Click the Applications button in the Dock
- Type “clock” and hit Enter to view “Date & Time Settings”
- Turn “Automatic Date & Time” off by clicking on the slider to the right
- Click on the date/time shown below the sliders, and change to be the correct date and time
- Turn “Automatic Date & Time” and “Automatic Time Zone” on
-
Disable Onscreen Keyboard
- Open the system menu in the upper-right corner
- Click on the gear icon to open Settings
- Scroll down the left-hand sidebar and click on “Accessibility”
- Click on “Typing”
- Disable “Screen Keyboard”
-
Check Ubermix Version
- Click on the update icon in the upper-right corner of the screen, to the left of the power menu and battery indicator
- Look for “Version: ubermix (…)”
- E.G. “ubermix 7.0lv1” is the current version
-
Install/Update Ubermix
Make sure Secure Boot is disabled and USB Boot / Boot Menu are enabled (if applicable) before trying to install Ubermix
Acer B117, B118-RN, B118-G2, B311R-31, B311R-33
- Completely power off the system
- Insert Ubermix install key
- Press the power button and immediately start tapping F12 to get to the boot menu
- Use the arrow keys to select the USB device (usually called USB FDD, USB HDD, or Linpus Lite) and press Enter
(Option 1) Reset Disk Partition. This will erase everything on the laptop
- Press 5 then press Enter for expert options
- Press 4 then press Enter, type
yes, and press Enter to reset the primary disk partition - Press Enter once more to return to the main menu
- Press 1 to Easy Image and press Enter to continue
- Type
yesthen press Enter to continue - Type
uefithen press Enter to continue - Wait for the install to complete
- Press Enter twice to restart
(Option 2) Upgrade with a clean install. This will erase old user data
- Press 1 to Easy Image and press Enter to continue
- Type
cleanthen press Enter to continue - Type
nothen press Enter to ignore user data - Wait for the install to complete
- Press Enter twice to restart
Lenovo 300w
- Completely power off the system
- Insert Ubermix install key
- Press the power button and immediately start tapping F12 to get to the boot menu
- Use the arrow keys to select the USB device (usually called USB FDD, USB HDD, or Linpus Lite) and press Enter
(Option 1) Reset Disk Partition. This will erase everything on the laptop
- Press 5 then press Enter for expert options
- Press 4 then press Enter, type
yes, and press Enter to reset the primary disk partition - Press Enter once more to return to the main menu
- Press 1 to Easy Image and press Enter to continue
- Type
yesthen press Enter to continue - Type
uefithen press Enter to continue - Wait for the install to complete
- Press Enter twice to restart
(Option 2) Upgrade with a clean install. This will erase old user data
- Press 1 to Easy Image and press Enter to continue
- Type
cleanthen press Enter to continue - Type
nothen press Enter to ignore user data - Wait for the install to complete
- Press Enter twice to restart
ASUS BR1102FGA
- Completely power off the system
- Insert Ubermix install key
- Press the power button and immediately start tapping ESC to get to the boot menu
- Use the arrow keys to select the USB device (usually called USB FDD, USB HDD, or Linpus Lite) and press Enter
(Option 1) Reset Disk Partition. This will erase everything on the laptop
- Press 5 then press Enter for expert options
- Press 4 then press Enter, type
yes, and press Enter to reset the primary disk partition - Press Enter once more to return to the main menu
- Press 1 to Easy Image and press Enter to continue
- Type
yesthen press Enter to continue - Type
uefithen press Enter to continue - Wait for the install to complete
- Press Enter twice to restart
(Option 2) Upgrade with a clean install. This will erase old user data
- Press 1 to Easy Image and press Enter to continue
- Type
cleanthen press Enter to continue - Type
nothen press Enter to ignore user data - Wait for the install to complete
- Press Enter twice to restart
-
Disable Secure Boot
Acer B117, B118-RN, B118-G2, B311R-31, B311R-33
- Press the power button and immediately start tapping F2 to get into the BIOS
- Use the arrow keys to navigate to the “Security” tab
- Select “Set Supervisor Password” and enter
1for the password - Use the arrow keys to navigate to the “Boot” tab
- Select “Secure Boot” and make sure it is “Disabled”
- Use the arrow keys to navigate back to the “Security” tab
- Select “Set Supervisor Password” and enter
1for the password to remove it - Press F10, then Enter to save settings and exit
Lenovo 300w
- Press power button and begin tapping F2 to enter BIOS
- Use the down arrow key to navigate to the “Security” tab
- Use the right arrow key to enter the “Security” tab, then down to select “Secure Boot”
- Hit Enter, choose “Disabled”, then Enter again
ASUS BR1102FGA
- Press the power button and immediately start tapping
ESC to get to the boot menu - Use the arrow keys to select “Enter Setup” and hit Enter
- Press
F7 to enter Advanced Mode - Use the right arrow key to navigate to the “Security” tab
- Use the down arrow key to navigate to “Secure Boot”, then hit Enter
- Use the down arrow key to navigate to “Secure Boot Control”, hit Enter, select “Disabled”, and hit Enter
-
Reset BIOS Password (ACER LAPTOPS ONLY)
- Use the UMC BIOS Reset Tool to get the Unlock Key
- Enter the Unlock Key as stated on UMC2, and enter BIOS Setup
- Use the arrow keys to move to the “Security” tab.
- Press Enter to set the Supervisor Password
- Enter the Unlock Password once more
- Press Enter four times to clear the password
- Press F10 then Enter to save and exit
-
Update BIOS
Only perform BIOS updates when requested to by EdTech
BIOS Auto-Updater
This updater does not work on the Acer B118-G2 laptop; instructions on using the B118-G2 BIOS key are at the bottom of this page
- Plug the system in to power
- Insert the AutoBIOS update key
- Turn on the system and enter BIOS setup using the F2 key
- Switch “Network Boot” to “Enabled” on the “Main” tab
- Disable “Secure Boot” on the “Boot” tab and make sure “Boot Mode” is set to UEFI
- Press F10 then Enter to save settings
- Begin tapping F12 to enter the boot menu
- Use the arrow keys to select the “USB Device” and press Enter
- The Windows loading icon will appear below the laptop logo. This is normal.
- A Command Prompt window will appear with some automated commands running.
- This BIOS update key is automated, so just read the prompts and either: Press Enter to continue with the update process or press X to cancel and shutdown the computer
- The computer will be automatically checked to make sure it is plugged into a charger and the battery is at or above 15%
- You will be prompted to plug in the charger if it isn’t already
- If the battery is below 15%, you will be asked to wait, with Current Charge prompts appearing with the current percentage (in multiples of 5%)
- Enter BIOS once again using the F2 key
- Use the Enter and arrow keys to correct the BIOS settings
- “Secure Boot” Disabled, “F12 Boot Menu” Enabled
- Press F10 then Enter to save the settings
B118-G2 BIOS Updater
- Plug the system in to power
- Insert the B118-G2 BIOS update key
- Turn on the system and enter BIOS setup using the F2 key
- Disable “Secure Boot” on the “Boot” tab and make sure “Boot Mode” is set to UEFI
- Press F10, then Enter to save settings
- Begin tapping F12 to enter the boot menu
- Use the arrow keys to select the “USB Device” and press Enter
- A black screen with text will appear; simply leave it alone and the update will proceed automatically
- Once the update completes the system will restart
- Enter BIOS once again using the F2 key
- Use the Enter and arrow keys to correct the BIOS settings
- “Secure Boot” Disabled, “F12 Boot Menu” Enabled
- Press F10 then Enter to save the settings